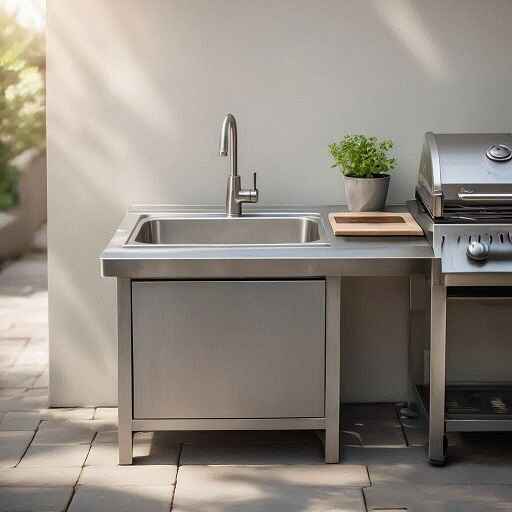

When you are working with a compact backyard, every square foot counts. Most homeowners obsess over finding the perfect grill, but here is what they miss: the wrong sink can kill your entire outdoor kitchen layout. A bulky, poorly planned sink eats up precious counter space and disrupts your workflow. This guide cuts through the noise and shows you exactly which outdoor kitchen sinks work best in tight spaces, how to choose between cabinet-mounted and standalone options, and what features actually matter when your patio measures closer to 100 square feet than 500. Before choosing a sink, it’s smart to understand the full outdoor kitchen cost breakdown so you don’t overspend.
Table of Contents
What Makes a Good Outdoor Kitchen Sink for Small Backyards
Choosing the right sink for a cramped outdoor space requires a different approach than outfitting a sprawling patio kitchen. These four factors determine whether your sink enhances or sabotages your small backyard setup.
Size and Depth
Compact doesn’t mean shallow. Look for sinks between 15 and 24 inches wide, which provide functional workspace without dominating your counter. Depth matters too, a 7 to 9-inch basin handles most outdoor cooking tasks while preventing excessive splashing. Anything deeper becomes awkward to use and wastes vertical cabinet space below.
Single vs Double Bowl
Double bowl sinks sound appealing until you realize they demand at least 30 inches of counter width. In small backyards, a single bowl delivers better value. You get one generous basin for washing large cutting boards and platters instead of two cramped compartments that cannot accommodate anything substantial.
Drain Placement
Rear-positioned drains create more usable basin space and simplify plumbing connections in tight quarters. Center drains work fine but reduce the effective workspace inside your sink. For space-constrained setups, those extra 2 to 3 inches of unobstructed basin floor make a noticeable difference during prep work.
Mounting Type
Drop-in sinks install quickly and work with most countertop materials, making them ideal for DIY projects. Undermount options create a sleeker look and slightly more counter space since there is no lip, but they require professional installation and solid surface countertops. For small backyards where you are counting inches, undermount mounting recovers just enough space to matter. As outlined in installation resources from manufacturers like Danver, undermount sinks require secure brackets or epoxy adhesive for installation.
Best Outdoor Kitchen Sinks for Small Backyards
These five sinks deliver the durability and size proportions that small outdoor kitchens demand. Each one handles weather exposure while fitting into layouts where every inch counts.
Blaze 21-Inch Drop-In Sink
Best for: Compact patio islands and mobile outdoor carts
Pros:
- 21-inch width fits narrow counter spans without sacrificing basin depth
- 16-gauge stainless steel construction resists dents from dropped cookware
- Rear drain position maximizes usable workspace inside the basin
Cons:
- Drop-in rim protrudes slightly, reducing effective counter space
- Single faucet hole limits fixture upgrade options
Why it is good for small spaces: This sink delivers full-size functionality in a footprint that leaves room for flanking prep areas. The compact width means you can install it in a 36-inch cabinet base and still have counter space on both sides for cutting boards or serving platters.
RCS Stainless 15-Inch Bar Sink
Best for: Deck corners and secondary prep stations
Pros:
- Ultra-compact 15 by 15-inch footprint tucks into awkward corner spaces
- 18-gauge stainless handles outdoor temperature swings without warping
- Deep 8-inch basin accommodates stockpots despite small perimeter
Cons:
- Limited surface area makes washing large sheet pans difficult
- Requires careful faucet selection to avoid splashing
Why it is good for small spaces: When your entire outdoor kitchen measures under 6 feet, this bar-style sink provides essential cleanup capability without dominating your layout. It works particularly well as a dedicated hand-washing or vegetable-prep station alongside your main grill area.
Lion Premium Grills 24-Inch Single Bowl
Best for: Balcony kitchens and narrow patio runs
Pros:
- Marine-grade 304 stainless steel withstands salt air and humidity
- 24-inch width offers generous workspace while staying counter-friendly
- Sloped bottom with rear drain prevents standing water issues
Cons:
- Higher price point than comparable residential-grade options
- Requires minimum 27-inch cabinet width for proper installation
Why it is good for small spaces: The elongated rectangular shape gives you maximum basin length without excessive width. This geometry works perfectly along narrow counter runs where you need washing capacity but cannot afford depth that juts into your walking space.
Sunstone 20-Inch Undermount Sink
Best for: Built-in concrete or granite countertop installations
Pros:
- Undermount design eliminates rim, adding roughly 2 inches to usable counter space
- 20-gauge stainless provides solid durability at a mid-range price
- Rounded corners simplify cleaning and prevent debris buildup
Cons:
- Requires professional installation with compatible countertop materials
- No pre-drilled faucet holes demands separate deck plate or wall-mount fixture
Why it is good for small spaces: That reclaimed 2 inches of counter space from the undermount design translates to meaningful extra room when your entire prep area measures 4 feet or less. The sleek integration also makes small kitchens look more intentional and less cluttered.
Cal Flame 18-Inch Corner Sink
Best for: L-shaped patio layouts and unused corner zones
Pros:
- Purpose-built corner design activates dead space in angular layouts
- 18-inch diagonal measurement fits standard corner cabinet bases
- Front-center drain optimizes the triangular basin shape
Cons:
- Unconventional shape limits replacement options if damaged
- Corner placement can complicate plumbing runs
Why it is good for small spaces: Corner sinks transform the most underutilized area of small outdoor kitchens into functional workspace. If you are building an L-shaped setup, this configuration gives you sink access without sacrificing valuable linear counter runs for prep work.
Sink Cabinet vs Standalone Sink: Which Saves More Space?
The cabinet question divides outdoor kitchen planners more than any other decision. Both approaches work in small backyards, but they serve different priorities.
| Feature | Cabinet-Integrated Sink | Standalone Sink Station |
|---|---|---|
| Footprint | Compact (requires only cabinet width) | Larger (needs structural frame plus clearance) |
| Counter Space | Maximum (cabinets provide adjacent prep area) | Minimal (standalone units rarely include extended surfaces) |
| Storage | Built-in (shelves and doors below sink) | None or very limited |
| Installation | More complex (requires leveling, plumbing, mounting) | Simpler (usually arrives as complete unit) |
| Flexibility | Permanent (difficult to relocate) | Portable (can move with deck furniture) |
| Cost | Higher upfront (cabinet plus sink) | Lower entry point (all-in-one pricing) |
Practical advice for small backyards
Choose outdoor kitchen cabinets with sink if you are building a permanent setup and need storage. The cabinet base provides a place to stash cleaning supplies, trash bags, and outdoor cooking tools while creating a cohesive counter run. Your sink becomes part of a functional workspace rather than an isolated fixture.
Pick a standalone sink station if you rent, if your patio layout changes seasonally, or if you are testing outdoor cooking before committing to a full kitchen. These units give you immediate functionality without construction, and you can relocate them as your entertaining style evolves.
The space-saving winner? Cabinet-integrated systems, hands down. They deliver more utility per square foot by combining three functions that are sink, storage, and counter, in one footprint. Standalone units waste perimeter space because they need clearance on all sides, while cabinets can sit flush against walls or adjacent modules.
Outdoor Kitchen Sink Size Guide (Small Space Focus)
Getting the dimensions right separates functional outdoor kitchens from frustrating ones. These measurements reflect real-world testing in backyards where space comes at a premium.
Ideal Widths
For primary outdoor kitchen sinks in small backyards, target 18 to 24 inches. This range provides enough basin area to wash large platters and cutting boards without dominating your counter span. Anything under 15 inches becomes too cramped for practical cooking tasks. Anything over 27 inches starts competing with your grill for real estate and forces compromises elsewhere in your layout.
Secondary sinks or dedicated hand-washing stations can drop to 12 to 15 inches. These compact options work well in corner installations or as supplements to a main prep sink.
Depth Recommendations
Basin depth of 7 to 9 inches hits the sweet spot for outdoor use. Shallower than 7 inches and you’ll deal with constant splashing when rinsing vegetables or washing dishes. Deeper than 9 inches and you sacrifice storage space in the cabinet below while making the sink awkward to use without stepping on a platform.
Cabinet depth should measure at least 24 inches from front to back to accommodate plumbing connections and provide stable support. If you are building outdoor kitchen sink and cabinet combinations, this 24-inch depth also gives you enough counter overhang in front for comfortable working posture.
Visual Spacing Tips
Apply the triangle rule: position your sink no more than 6 feet from your grill and no more than 6 feet from your main prep counter. This creates an efficient work zone where you can move between stations without excessive steps.
Leave at least 18 inches of clear counter space on one side of your sink for staging clean dishes or prepped ingredients. If your layout forces a choice, put this landing zone between the sink and grill rather than on the far side, since most workflow moves from sink to cooking surface.
Maintain 36 inches of clearance behind your sink for comfortable standing room. Tight layouts often skimp here, creating awkward situations where you are pressed against furniture or plants while trying to work. If you cannot get 36 inches, consider a narrower sink or a different position that opens up the traffic pattern.
Installation Options (DIY-Friendly)
Small outdoor kitchens reward clever installation approaches that maximize function without requiring contractor-level skills or budgets.
Freestanding Sink Stations
These self-contained units arrive essentially complete. You unpack them, level the legs, connect a garden hose for water supply, and route the drain to a nearby disposal point. The simplicity makes them perfect for renters or anyone who wants to test outdoor cooking before committing to permanent construction.
Most freestanding models include a basic splash guard and a lower shelf, though storage remains minimal. Look for versions with adjustable feet so you can compensate for uneven patio surfaces without shimming. The main installation challenge involves drainage, you’ll need either a nearby floor drain, a sloped path to a lawn area, or a bucket system you empty manually.
Cabinet-Integrated Sinks
This approach demands more upfront effort but delivers professional results. Start by assembling your outdoor kitchen sink cabinet according to the manufacturer’s directions, ensuring it is perfectly level in both directions. Cut the sink opening using the template provided, then seal all exposed edges with marine-grade silicone to prevent moisture penetration.
Install the sink itself using the mounting clips for drop-in models or the appropriate adhesive and supports for undermount versions. Connect your plumbing before you secure the cabinet in its final position, since access becomes restricted once everything’s in place. Most DIYers can handle this installation with basic tools and a weekend, though you might want a plumber for the water supply line if you are tapping into your home’s system rather than using a hose connection.
Deck vs Patio Setups
Wooden decks require extra waterproofing attention around your sink area. Install a drip pan underneath the sink cabinet and ensure all drain connections are completely sealed. Route drain lines so they don’t drip onto deck boards, where standing water causes rot. Consider using deck tiles or outdoor-rated rubber matting in front of your sink to protect the wood from splashing.
Concrete or paver patios simplify installation since water damage is not a concern. You can set cabinets directly on the surface after leveling. If your patio slopes for drainage, use adjustable feet on your cabinets to create a level platform, trying to work at a tilted sink becomes annoying quickly.
For both surfaces, secure freestanding cabinets with L-brackets to prevent tipping if someone leans heavily against the counter. Small outdoor kitchens often get used as casual bars during parties, and an unsecured cabinet can shift unexpectedly.
Maintenance & Weather Resistance
Outdoor sinks face conditions that would destroy indoor fixtures in months. Choosing the right materials and following basic maintenance prevents expensive replacements.
Stainless Steel Grades
Type 304 stainless steel represents the minimum acceptable grade for outdoor kitchen sinks. It contains enough chromium and nickel to resist rust formation in typical weather conditions. Marine-grade 316 stainless adds molybdenum for superior corrosion resistance in coastal areas where salt air accelerates deterioration. If you live within 10 miles of an ocean, the upgrade to 316 stainless pays for itself by avoiding premature rust spotting. Type 304 stainless steel is widely recommended as the minimum grade for outdoor kitchens due to its balance of corrosion resistance and affordability.
Gauge numbers run counterintuitively, lower numbers mean thicker, stronger steel. Eighteen-gauge stainless provides adequate durability for most residential outdoor kitchens. Sixteen-gauge offers enhanced dent resistance and a more substantial feel. Avoid anything thinner than 20-gauge for outdoor applications, as the lighter material flexes excessively and shows damage from normal use.
Drain Protection
Outdoor drains clog faster than indoor versions because they collect leaves, pollen, and insects alongside regular food debris. Install a removable basket strainer in your sink drain to catch solid material before it enters the plumbing. Empty this strainer after every cooking session, especially during fall when leaf debris increases.
Pour a gallon of water through your drain weekly during the outdoor cooking season to keep the trap filled and prevent sewer gases from backing up. In winter, if you live in a freezing climate, blow out the drain lines with compressed air and pour RV antifreeze into the trap to prevent ice damage.
Covers and Protection
Quality covers protect your outdoor sink from UV degradation, falling branches, and accumulated grime during the off-season. Look for covers made from solution-dyed fabric with water-resistant backing rather than cheap vinyl, which cracks after one summer of sun exposure.
For cabinet-based installations, covers should extend over the entire counter area, not just the sink basin. This protects your faucet fixtures and prevents water from pooling on horizontal surfaces where it can work its way into cabinet interiors. Choosing the right outdoor faucet is just as crucial; check out our guide to the best outdoor kitchen faucets for options that complement your sink.
Between cooking sessions during active months, a simple practice makes a huge difference: dry your sink basin and faucet with a towel after each use. This prevents mineral deposits and water spots that build up into staining over time. Stainless steel can handle water exposure, but dried water always looks cleaner than evaporated water with its residue left behind.
Buying Checklist
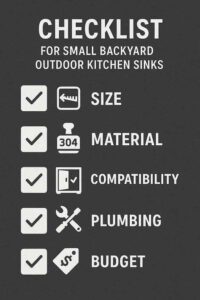
Run through these five points before purchasing any outdoor kitchen sink for your small backyard. Miss one and you’ll either deal with ongoing frustration or face an expensive do-over.
Size
Measure your available counter space, then subtract 6 inches to account for faucet clearance and edge margins. This gives you the maximum sink width that actually fits your layout. Verify the depth dimension fits your cabinet or base structure with room for plumbing connections behind the basin. Write down these measurements and bring them when shopping, because even experienced DIYers misremember dimensions and buy sinks that don’t fit.
Material
Confirm stainless steel grade, look for stamped markings indicating 304 or 316 on the sink itself. Check gauge thickness by pressing firmly on the basin floor; 16 or 18-gauge steel barely flexes, while lighter gauges feel noticeably springy. Avoid composite materials like acrylic or granite composite for outdoor kitchen sinks, as UV exposure and temperature cycles cause these materials to crack or discolor within a few seasons.
Cabinet Compatibility
If you are buying an outdoor kitchen sink cabinet as a package, verify that sink and cabinet come from the same manufacturer or that dimensions align precisely. Mismatched components force you into retrofit modifications that compromise both appearance and weather resistance. For standalone sinks going into existing cabinets, confirm the cabinet can support the sink’s weight when filled with water, which can exceed 50 pounds depending on basin size.
Plumbing Access
Identify your water source before selecting a sink location. Garden hose connections work fine for most small outdoor kitchens, but they require a nearby exterior faucet. If you are tapping into home water lines, verify local codes allow outdoor plumbing and determine whether you need frost-proof fixtures for winter. For drainage, confirm you have legal options for disposing of sink water, some municipalities prohibit dumping grey water onto lawns or gardens, requiring connection to sewer lines instead.
Budget
Quality outdoor kitchen sinks start around $200 for basic 18-gauge stainless models and reach $600 or more for marine-grade options with premium finishes. When you add outdoor kitchen cabinets with sink, complete packages typically run $800 to $2,000 depending on size and materials. Budget an additional 20 percent beyond the sink cost for faucets, drain assemblies, and installation supplies. Trying to save money with residential-grade sinks in outdoor applications always costs more long-term when you are replacing failed units.
FAQs
What is the best sink size for an outdoor kitchen?
For small backyards, an 18 to 24-inch wide single-bowl sink provides the best balance of functionality and space efficiency. This size handles full-size dinner plates and large cutting boards while leaving room for flanking prep areas. Basin depth should measure 7 to 9 inches, deep enough to contain splashing but shallow enough to avoid awkward reaching. Anything larger than 24 inches starts competing with your grill and other essential equipment for counter space. Smaller secondary sinks in the 12 to 15-inch range work well for dedicated hand-washing or vegetable-prep stations.
Can you install an outdoor sink without plumbing?
Yes, several practical options exist for outdoor sinks without permanent plumbing. The simplest approach uses a garden hose connected to an exterior faucet for water supply and a drain that empties into a bucket or routes to a nearby lawn area via flexible tubing. Portable hand-washing stations with built-in water tanks eliminate even the hose connection, though you’ll need to refill the reservoir regularly. For grey water disposal, check local regulations, some areas permit draining onto landscaping while others require connection to sewer systems. Avoid letting sink water pool on patios or decks, as standing water creates slip hazards and promotes algae growth.
Are outdoor kitchen sinks weatherproof?
Quality outdoor kitchen sinks made from 304 or 316 stainless steel resist weather damage effectively, but they are not maintenance-free. Stainless steel handles rain, snow, and temperature fluctuations without rusting when properly cared for. The critical vulnerability points are drain assemblies and faucet connections, which need winterization in freezing climates to prevent burst pipes. In coastal areas, salt air accelerates corrosion, making regular rinsing and the upgrade to marine-grade 316 stainless important. Use covers during extended periods of non-use to protect faucets and prevent debris accumulation. Even weatherproof sinks benefit from basic maintenance like draining standing water and removing accumulated grime that can cause staining over time.
Do I need a cabinet under my outdoor sink?
You don’t strictly need a cabinet, but adding one delivers significant benefits in small outdoor kitchens. Cabinets provide essential storage for cleaning supplies, trash bags, and outdoor cooking tools that would otherwise clutter your limited space. They also hide unsightly plumbing connections and create a finished, intentional appearance rather than the exposed-fixture look of standalone sinks. From a structural perspective, cabinets offer stable mounting for your sink and counter, eliminating the wobbly feel common with basic sink stands. The main reasons to skip cabinets are budget constraints or the need for a portable setup you can relocate seasonally. If you are building a permanent outdoor kitchen in a space-limited backyard, cabinets maximize functionality per square foot by combining storage, sink mounting, and additional counter space in one footprint.